Back to TheWorxHub for Senior Living Main Menu
Creating Scheduled Templates for Housekeeping
In TheWorxHub, creating templates for common housekeeping tasks allows you to quickly and effectively create housekeeping scheduled work orders for each of your locations. *Note: If you do not currently have the Housekeeping application, please contact your Sales Representative or Client Services for more information.
To access the Template settings in TheWorxHub:
- Click on the Settings tab, then select the Templates tab.
Creating a Housekeeping Template
- Click on the Add Scheduled Work Order Template button.
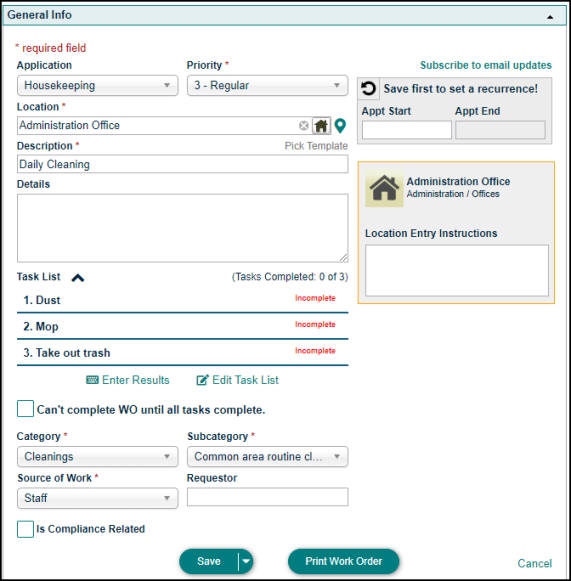
- Select Housekeeping from the Department drop down.
- Select a Priority for the template.
- Type and select the name of the location, or click on the Location Picker (
 ) to select a Location for the template. *Note: Selecting a location is an optional step. The location selected here will not copy over to the scheduled work order form when applying a template.
- If you have access to the Space Management application, click the map pin icon (
 ) to select a location from a floor plan drawing. *Note: If you do not currently have this application, please contact your Sales Representative or Client Services for more information.
- If you have access to the Space Management application, click the map pin icon (
- Enter a Description of the work that needs to be performed.
- Type any additional details and notes in the Details box.
- Click on Add New Task to choose what type of tasks you'd like to add.
- In the pop-up window, select a Task Type from the drop-down menu, and then click the plus sign icon (
 ). *Note: You are able to add different task types to the task list.
 - The information you enter in the task field will depend on the Task Type you select:
- Checkbox: This option is common for simple task lists where each step is documented, and you want to track which tasks have been completed vs. not completed.
- Number form data input: This option is used when you need to capture a measurement, but there is no requirement to link that input to any sort of corrective action, such as capturing the volts of the generator.
- Text form data input: This option is used when you need to input free form text data, such as the start time of when you began the generator test, or capturing a qualitative value on the condition of the equipment.
- Barcode scan: This is a unique task type where you can specify that step 1 require you to scan the asset barcode for the equipment that you're working on. This helps to prove that a technician was actually at the required location. * Note: You can only complete a barcode task type from your mobile device where barcode scanning is supported.
- Meter Reading: This option is used when you need to capture a reading on a pre-existing meter, such as water temperatures thresholds or odometer reading incremental meters. *Note: Meter reading style tasks can trigger action from a meter based scheduled work order.
- Pass/Fail: This task type will automatically trigger a corrective work order template from the failure. Because this question type requires you to leverage a pre-existing template, it's important to review any pass/fail tasks to ensure an appropriate template exists and it linked to the task.
- Add as many tasks as needed and click Save when you're finished.
- Check the Can't complete WO until all tasks complete box to require the completion of all assigned tasks prior to updating the work order status to Complete.
- Select a Category to specify the type of work being done. Then select a Subcategory to further describe the work. *Note: The Category you select will determine the Subcategories listed in the pick list.
- Choose a Source of Work from the pick list.
- Check the Is Compliance Related box if the work will be performed to fulfill a compliance requirement. *Note: The Is Compliance Related box is only visible for users with the Can See Compliance Checkbox permission in User Roles Settings.
- Expand the work order panels by clicking on the panel title and enter any information needed.
- Click Save.
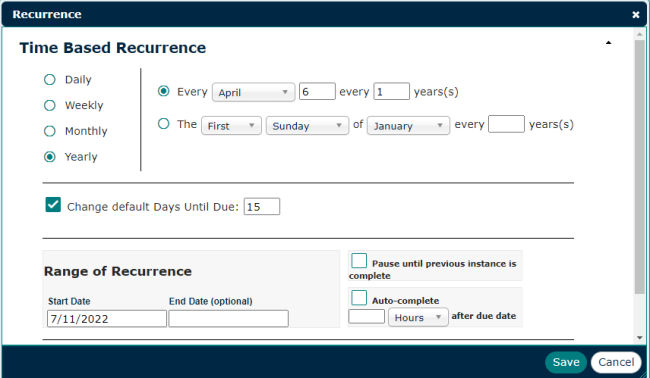
Recurrence
- Select your time based recurrence in the window that appears. You can set up a Daily, Weekly, Monthly, or Yearly recurrence.
- For example, to set up a resident room cleaning schedule that occurs weekly on a Monday, select the Weekly option, enter a one in the recurrence field, and select Mon.
- If you would like to override the default Days Until Due setting, check the box next to Change default Days Until Due, and enter the number of days it should take to complete the work.
- In the Range of Recurrence section, the Start Date will automatically fill in with today's date. Change the Start Date and enter an End Date if needed.
- If you would like the schedule of work to Pause until previous instance is complete, check the box. This will prevent the schedule from producing any work orders until the previously generated work order has been marked completed.
- For housekeeping work, we recommend checking the Auto-complete box if the volume of work occurs often. Enter a number of hours to auto-complete the work order after the due date. This will allow for a window of opportunity to change and completion details if something out of the ordinary should occur as well as ensure the work order does not appear on the dashboard the next day. *Note: Housekeeping work orders that are set to auto-complete will appear on the Routine Duties section of the Dashboard.
- Click Save.